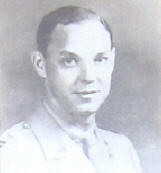
PROFILE OF WARNER
MARSHALL JR.
“In Honor of Those Who Served”
by Vicky Amon
In 2012, 69 years after his death, the name of Captain Warner Marshall Jr. was added to the Richard M. Kemper Memorial Park Monument on the grounds of Mamaroneck High School. He joins the over 100 other honored Larchmont men and women who gave their lives for our country during World War II.
Captain Marshall was part of the large Marshall and Beringer extended family who have lived in Larchmont starting at the turn of the last century. He grew up on 12 Seton Road near the eponymous ‘rocking stone’ and went on to Phillips Andover and Yale University. In 1930, after graduation from Yale, he moved to New York City to build a career in finance; he was also active in many city volunteer projects. In 1942, he joined the Army Air Force as a Captain, and soon after became a member of the Planning Staff under the legendary General Hap Arnold. He worked at the famous Cairo Conference in November 1943, one of the major meetings of Allied Powers discussing the future of post-war Asia. When the Conference ended, Captain Marshall was sent on a review tour of the war area, with plans to travel through India, Burma and China. He was on a troop transport when the plane crashed in northeast India on December 12, 1943. He was 34 years old.
Captain Marshall was honored posthumously with the Legion of Merit Award. There is a burial stone for him in the Honolulu Memorial, along with over 18,000 of his fellow soldiers who died in the Pacific Theater, but whose full remains were not able to be recovered.
Additional Information
(Posted March 2022)
Burial
Censuses
Education
Family Members
Home
Marriage
Newspaper Articles
Photos